우선 Dialog Based기반으로 한 프로젝트에서 해본다.
트레이 아이콘을 만들기 위해서는 우선 헤더에 사용자 메시지를 추가해야 한다.

#define  UM_TRAYICON  WM_USER+7


class Login : public StandardDialog
{

...

}

그리고 헤더 메시지맵에 추가한다.

// Implementation
protected:

 // Generated message map functions
 //{{AFX_MSG(Login)
 afx_msg void OnConfirm();
 virtual void OnCancel();
 afx_msg BOOL OnSetCursor(CWnd* pWnd, UINT nHitTest, UINT message);
 virtual BOOL OnInitDialog();
 afx_msg void OnExit();
 afx_msg void OnClose();
 afx_msg void OnLathe();
 afx_msg void OnDestroy();
 afx_msg void OnExit2();
 afx_msg void OnShow();
 afx_msg void OnMymenuMsg();
 //}}AFX_MSG

//이곳은 자동으로 생성되는 코드가 아닌 사용자가 직접 정의해주는 부분이다.

 LONG TrayIconShow(WPARAM wParam,LPARAM lParam); //<--메시지 맵 추가 


 DECLARE_MESSAGE_MAP()
};

다음으로 cpp파일부분의 메시지 맵에 추가한다.

BEGIN_MESSAGE_MAP(Login, StandardDialog)
 //{{AFX_MSG_MAP(Login)
 ON_BN_CLICKED(IDC_CONFIRM, OnConfirm)
 ON_WM_SETCURSOR()
 ON_BN_CLICKED(IDC_EXIT, OnExit)
 ON_BN_CLICKED(IDC_CLOSE, OnClose)
 ON_BN_CLICKED(IDC_LATHE, OnLathe)
 ON_WM_DESTROY()
 ON_COMMAND(ID_EXIT2, OnExit2)
 ON_COMMAND(ID_SHOW, OnShow)
 ON_COMMAND(ID_MYMENU_MSG, OnMymenuMsg)
 //}}AFX_MSG_MAP
 ON_MESSAGE(UM_TRAYICON,TrayIconShow)  //<--추가 부분
END_MESSAGE_MAP()


특정버튼을 클릭했을떄 트레이 아이콘이 만들어진다면

그 함수부분에 다음과 같이 코딩한다.

void Login::OnOK()

{

    ShowWindow(SW_HIDE);

    NOTIFYICONDATA nid; //<--NOTIFYICONDATA 구조체를 사용

    nid.cbSize = sizeof(nid);

    nid.hWnd = m_hWnd;    //현재 다이얼로그의 윈도우 핸들

    nid.uID = IDI_MYICON;   //아이콘의 리소스ID

    nid.uFlags = NIF_MESSAGE|NIF_ICON|NIF_TIP;

    nid.uCallbackMessage = UM_TRAYICON; //우리가 만든 메시지

    nid.hIcon = AfxGetApp()->LoadIcon(IDI_MYICON);

    lstrcpy(nid.szTip,"트레이아이콘"); // 툴팁

    // taskBar상태영역에 아이콘 추가,삭제,수정할때 시스템에 메시지 전달
    Shell_NotifyIcon(NIM_ADD,&nid); //<--중요부분

    SendMessage(WM_SETICON,(WPARAM)TRUE,(LPARAM)nid.hIcon);

}

그리고 위의 헤더에서 정의했던 TrayIconShow함수를 구현한다.

여기서는 오른족 마우스를 트레이 아이콘에 클릭했을경우 메뉴가 나타나게 한다.

LONG Login::TrayIconShow(WPARAM wParam, LPARAM lParam)
{
    if(lParam == WM_RBUTTONDOWN) //오른쪽 마우스 클릭시
    {

       //메뉴를 로드한다.
        CMenu menu, *pMenu;

        CPoint pt;

        menu.LoadMenu(IDR_MYMENU);

        pMenu = menu.GetSubMenu(0);

        GetCursorPos(&pt);

        pMenu->TrackPopupMenu(TPM_RIGHTALIGN,pt.x,pt.y,this);
    }

 //트레이 아이콘을 더블클릭했을때 윈도우가 보여지게 한다.

  if(lParam == WM_LBUTTONDBLCLK)
  {
     ShowWindow(SW_SHOW); //윈도우를 보여준다.
   }
    return 0L;
}

//OnDestroy()함수에서 트레이아이콘을 파괴한다.

void Login::OnDestroy() 
{
 StandardDialog::OnDestroy();
 CDialog::OnDestroy();

    // TODO: Add your message handler code here
    if(m_bLoad)
    {

        NOTIFYICONDATA nid;

        nid.cbSize = sizeof(nid);

        nid.hWnd = m_hWnd;
  
        nid.uID = IDI_MYICON;

        Shell_NotifyIcon(NIM_DELETE,&nid);//<-중요부분
    }

 // TODO: Add your message handler code here
}

//닫기 버튼을 클릭하면 WM_CLOSE메시지가 발생하며 OnClose()함수가 호출되어진다.

void Login::OnClose() 
{
 // TODO: Add your control notification handler code here
 ShowWindow(SW_HIDE); //닫기 버튼을 클릭했을때 윈도우를 숨긴다.
}

//메뉴 클릭시 함수구현은 따로 해주어야한다.

만약 Dialog Base기반이 아닌 Single Document나 Multi Document기반으로 했을때는

CMainFrame클래스에서 트레이 아이콘을 설정한다. 예를 보여주지!!

우선

CMainFrame의 헤더위헤 메시지 추가

#if !defined(AFX_MAINFRM_H__D76C111C_99ED_4DD1_8FE2_D3BAE04F60E7__INCLUDED_)
#define AFX_MAINFRM_H__D76C111C_99ED_4DD1_8FE2_D3BAE04F60E7__INCLUDED_

#if _MSC_VER > 1000
#pragma once
#endif // _MSC_VER > 1000

#define  UM_TRAYICON  WM_USER+7 //TrayIcon 메시지 정의

//트레이 아이콘 생성
int CMainFrame::OnCreate(LPCREATESTRUCT lpCreateStruct)

    ...................................................................................

   ...................................................................................

    m_bLoad = TRUE;
    NOTIFYICONDATA nid; //<--NOTIFYICONDATA 구조체를 사용

    nid.cbSize = sizeof(nid);

    nid.hWnd = m_hWnd;    //현재 다이얼로그의 윈도우 핸들

    nid.uID = IDR_MAINFRAME;   //아이콘의 리소스ID

    nid.uFlags = NIF_MESSAGE|NIF_ICON|NIF_TIP;

    nid.uCallbackMessage = UM_TRAYICON; //우리가 만든 메시지

    nid.hIcon = AfxGetApp()->LoadIcon(IDR_MAINFRAME);

    lstrcpy(nid.szTip,"주차관리 시스템(버전1.1)"); // 툴팁

    // taskBar상태영역에 아이콘 추가,삭제,수정할때 시스템에 메시지 전달
    Shell_NotifyIcon(NIM_ADD,&nid); //<--중요부분

    SendMessage(WM_SETICON,(WPARAM)TRUE,(LPARAM)nid.hIcon);

 return 0;

}

헤더의 메시지맵에 다음을 추가

// Generated message map functions
protected:
 //{{AFX_MSG(CMainFrame)
 afx_msg int OnCreate(LPCREATESTRUCT lpCreateStruct);
 afx_msg void OnDestroy();
 afx_msg void OnClose();
 afx_msg void OnWindowShow();
 afx_msg void OnWindowHide();
 afx_msg void OnWindowClose();
 //}}AFX_MSG
 LONG TrayIconShow(WPARAM wParam,LPARAM lParam); //<--메시지 맵 추가 


cpp에도 다음을 추가

// CMainFrame

IMPLEMENT_DYNCREATE(CMainFrame, CFrameWnd)

BEGIN_MESSAGE_MAP(CMainFrame, CFrameWnd)
 //{{AFX_MSG_MAP(CMainFrame)
 ON_WM_CREATE()
 ON_WM_DESTROY()
 ON_WM_CLOSE()
 ON_COMMAND(ID_WINDOW_SHOW, OnWindowShow)
 ON_COMMAND(ID_WINDOW_HIDE, OnWindowHide)
 ON_COMMAND(ID_WINDOW_CLOSE, OnWindowClose)
 //}}AFX_MSG_MAP
 ON_MESSAGE(UM_TRAYICON,TrayIconShow)  //<--추가 부분

위의 헤더에 선언했던 TrayIconShow함수 구현

LONG CMainFrame::TrayIconShow(WPARAM wParam, LPARAM lParam)
{
    if(lParam == WM_RBUTTONDOWN) //오른쪽 마우스 클릭시
    {

       //메뉴를 로드한다.
        CMenu menu, *pMenu;

        CPoint pt;

        menu.LoadMenu(IDR_MAINFRAME);

        pMenu = menu.GetSubMenu(1);

        GetCursorPos(&pt);

        pMenu->TrackPopupMenu(TPM_RIGHTALIGN,pt.x,pt.y,this);
    }

 //트레이 아이콘을 더블클릭했을때 윈도우가 보여지게 한다.

  if(lParam == WM_LBUTTONDBLCLK)
  {
     ShowWindow(SW_SHOW); //윈도우를 보여준다.
   }
    return 0L;
}


트레이 아이콘은 리소스를 차지 하기 때문에 나중에 파괴해 주어야 한다.

void CMainFrame::OnDestroy() 
{
 CFrameWnd::OnDestroy();
 // TODO: Add your message handler code here
 
 if(m_bLoad) //트레이 아이콘이 되어있다면
    {
        //리소스 해제 
        NOTIFYICONDATA nid;
  
        nid.cbSize = sizeof(nid);

        nid.hWnd = m_hWnd;
  
        nid.uID = IDR_MAINFRAME;

        Shell_NotifyIcon(NIM_DELETE,&nid);//<-중요부분
    }
}


Report 형식의 CListCtrl 에 자료 넣기

  • 1. 컬럼을 추가한다.
  • 2. Item을 추가한다.
  • 3. SubItem을 추가한다.

컬럼을 추가해야, 컬럼에 텍스트를 설정해 넣을 수가 있다. 컬럼 추가는 다음과 같이 한다.

          CListCtrl l;
          l.InsertColumn(0, "Control...", LVCFMT_LEFT, 100);
          l.InsertColumn(1, "HI...", LVCFMT_LEFT, 100);
          

Item을 추가해야, sub item을 추가할 수 있게 된다. Item은 0번부터 시작을 하고, sub item은 1번부터 시작을 한다. 우선 Item은 다음과 같이 추가한다.

          l.InsertItem(0, "first"); 
          l.InsertItem(1, "second"); 
          

subitem은, item의 index를 zero-based로 적고, subitem의 index는 1-based로 한다. 즉, item이 subitem의 index가 0번이라고 가정한다.

          l.SetItemText(0,1,"child of first");
          

이상을 정리하면 다음과 같다.

          +---------------------+---------------------+----------------------+
          |  InsertColumn(0, )  |  InsertColumn(1, )  |  InsertColumn(2, )   | 
          +---------------------+---------------------+----------------------+
          |    InsertItem(0, )  | SetItemText(0,1, )  |  SetItemText(0, 2, ) |
          +---------------------+---------------------+----------------------+
          |    InsertItem(1, )  | SetItemText(1,1, )  |  SetItemText(1, 2, ) |
          +---------------------+---------------------+----------------------+
          |    InsertItem(2, )  | SetItemText(2,1, )  |  SetItemText(2, 2, ) |
          +---------------------+---------------------+----------------------+
          |    InsertItem(3, )  | SetItemText(3,1, )  |  SetItemText(3, 2, ) |
          +---------------------+---------------------+----------------------+


Resource Management Best Practices

By Chuck Walbourn, Software Design Engineer

Microsoft Game Technology Group

June 2005

Introduction

Managed textures (also known as "automatic texture management") have been available in DirectX since version 6, with several revisions and enhancements made in subsequent releases. As of the Direct3D 9 API, the automatic resource management includes support for textures, vertex buffers, and index buffers all with a consistent shared interface. By using the Direct3D resource manager, applications can greatly simplify the handling of lost-device situations and can rely on the system to handle a reasonable amount of over-commitment of video memory resources.

Developers sometimes have difficulties using managed resources, in part due to the abstract nature of the system. While many common scenarios for resources are a good fit for managed resources, some cases are more performant using unmanaged resources. This article will discuss best practices for dealing with resources generally, how managed and unmanaged resources behave, and provide some detail on how resources are typically handled by the runtime and drivers.

Contents:

Video Memory

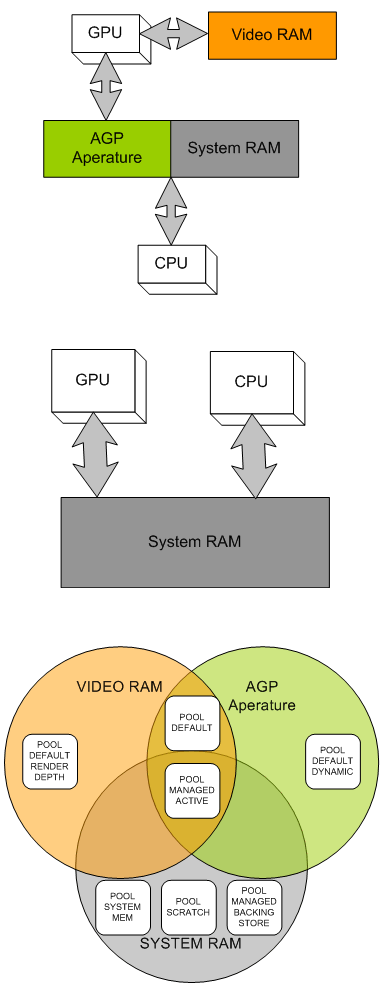
In order for the video system to make use of a resource, it must be located in memory accessible to the GPU. Local video memory is the most performant for the GPU, and certain resources (such as render targets and depth/stencil buffers) must be located in local video memory. With the advent of AGP, the GPU can also access a portion of the system memory directly. This memory area, known as the AGP aperture, is referred to as 'non-local video memory' and is not available for other purposes. Non-local video memory can be read from and written to by the CPU, which typically has no high-performance access to local video memory, and is thus ideal for use as a shared memory resource. A key thing to remember about AGP memory is that it, like local video memory, is invalidated in lost-device situations and persistent assets located there must be restored.


Some integrated video solutions make use of a Unified Memory Architecture where main memory is addressable by all components of the systems. Direct3D supports UMA without requiring any change to the application, utilizing the same hints as for local video memory configurations. For such systems, resources are always located in system memory and the driver is responsible for ensuring resources work much like they do in a more traditional architecture while taking advantage of UMA's properties and any specific behavior of the hardware implementation.


Managed Resources

The majority of your resources should be created as managed resources in POOL_MANAGED. All your resources will be created in system memory, and then copied as needed into video memory. Lost-device situations will be handled automatically from the system memory copy. Since not all managed resources are required to fit into video memory all at once, you can over commit memory where a smaller video memory working set of resources is all that is required to render in any given frame. Note that it is likely that the majority of this backing-store system memory will be paged out to disk over time, which is why the Reset operation can be slow due to the need to page this data in to restore the lost video memory.

The runtime keeps a timestamp for the last time a resource is used, and when a video memory allocation fails for loading a needed managed resource, it will release resources based on this timestamp in a LRU fashion. Usage of the SetPriority API takes precedence over the timestamp, so more commonly used resources should be set to a higher priority value. Direct3D 9.0 has limited information about the video memory managed by the driver, so the runtime may have to evict several resources in order create a large enough region for the allocation to succeed. Proper priorities can help eliminate situations where something gets evicted and then is required again shortly there-after. The application can also use the EvictManagedResources API call to force all the managed resources to be removed. Again, this can be a time-consuming operation to reload all the resources required for the next frame, but is very useful for level transitions where the working set changes significantly and removing video memory fragmentation.

A frame count is also kept to allow the runtime to detect if the resource it just choose to evict was used early the current frame, which implies a 'thrashing' situation where more resources are in use in a single frame than will fit into video memory. This triggers the replacement policy to switch to a MRU fashion rather than LRU for the remainder of the frame as this tends to perform slightly better under such conditions. Such 'thrashing' behavior will significantly impact the rendering performance. Note that the notion of current frame is tied to EndScene, so any application making use of managed resources needs to make regular calls to this method.

Developers looking to find more information about how managed resources are behaving in their application can make use of the RESOURCEMANAGER event query via the IDirect3DQuery9 interface. This only works when using the debug runtimes so this information cannot be depended upon by the application, but it provides deep detail on the resources managed by the runtime.

While understanding how the resource manager works can help when tuning and debugging your applications, it is important to not tie your application too tightly to the implementation details of the current runtime or drivers. Revisions of the driver or changes in hardware can significantly change the behavior, and future versions of Direct3D will have significantly improved and sophisticated resource management.

Driver Managed Resources

Direct3D drivers are free to implement the 'driver managed textures' capability, indicated by D3DCAPS2_CANMANAGERESOURCE, which allows the driver to handle the resource management instead of the runtime. For the (rare) driver that implements this feature, the exact behavior of the driver's resource manager can vary widely and you should contact the driver vendor for details on how this works for their implementation. Alternatively, you can ensure that the runtime manager is always used instead by specifying D3DCREATE_DISABLE_DRIVER_MANAGEMENT when creating the device.

Default Resources

While managed resources are simple, efficient, and easy-to-use there are times when using video memory directly is preferred or even required. Such resources are created in the POOL_DEFAULT category. Making use of such resources does cause additional complications for your application. Code is required to cope with the lost-device situation for all the POOL_DEFAULT resources, and performance considerations must be taken into account when copying data into them. Failure to specify USAGE_WRITEONLY or making a render target lockable can also impose serious performance penalties.

Calling Lock on a POOL_DEFAULT resource is more likely to cause the GPU to stall than working with a POOL_MANAGED resource unless using certain hint flags. Depending on the location of the resource the pointer returned could be to a temporary system memory buffer or it can be a pointer directly into AGP memory. If it is a temporary system memory buffer, data will need to be transferred to the video memory after the Unlock call. If the video resource is not write-only, data will have to be transferred into the temporary buffer during the Lock. If it is an AGP memory area, temporary copies are avoided but the cache behavior required can result in slow performance.

Care should be taken to write a full cache line of data into any pointer to AGP aperture memory to avoid the penalty of write-combing which induces a read/write cycle, and sequential access of the memory area is preferred. If your application needs to make random access to data during creation and you do not wish to make use of a managed resource for the buffer, you should work with a system memory copy instead. Once the data has been created, you can then stream the result into the locked resource memory to avoid paying a high penalty for the cache write-combing operation.

The LOCK_NOOVERWRITE flag can be used to append data in an efficient manner for some resources, but ideally multiple Lock and Unlock calls to the same resource can be avoided. Making proper use of the various Lock flags is important to optimal performance, as is using a cache-friendly data access pattern when filling locked memory.

Using Both Managed and Default Resources

Mixing allocations of managed and POOL_DEFAULT resources can cause video memory fragmentation and confuse the runtime's view of the video memory available for managed resources. Ideally, you should create all POOL_DEFAULT resources before making use of POOL_MANAGED resources or make use of the EvictManagedResources call before allocating unmanaged resources. Remember that all allocations made from POOL_DEFAULT that reside in video memory tie up memory for the life that resource that is unavailable for use by the resource manager or for any other purpose.

Note that unlike previous versions of Direct3D, the version 9 runtime will automatically evict some managed resources before giving up on a failed unmanaged resource allocation for a lack of video memory, but this can potentially create additional fragmentation and even force a resource into a sub-optimal location (a static texture in non local video memory for example). Again, it is best to allocate all required unmanaged resources up-front and before using any managed ones.

Dynamic Default Resources

Data that is generated and updated at a high frequency has no need for the backing-store since all the information will be re-created when restoring the device. Such data is typically best created in POOL_DEFAULT specifying the USAGE_DYNAMIC hint so the driver can make optimization decisions when placing the resource knowing it will be updated often. This typically means putting the resource into non-local video memory, and thus is usually much slower for the GPU to access than local video memory. For UMA architectures, the driver might choose a particular placement for dynamic resources to optimize for CPU write access.

This usage is typical for software skinning solutions and CPU-based particle systems filling out vertex/index buffers, and the LOCK_DISCARD flag will ensure that stalls are not created in cases where the resource is still in use from the previous frame. Using a managed resource in this case would update a system memory buffer, which would then be copied to video memory, and then used for only a frame or two before being replaced. For systems with non-local video memory, the extra copy is eliminated by proper use of this dynamic pattern.

Standard textures cannot be locked, and can only be updated via UpdateSurface or UpdateTexture. Some systems support dynamic textures, which can be locked and use the LOCK_DISCARD pattern, but a capabilities bit (D3DCAPS2_DYNAMICTEXTURES) must be checked before making use of such resources. For highly dynamic (video or procedural) textures, your application could create matching POOL_DEFAULT and POOL_SYSTEMMEM resources and handle video-memory update via the UpdateTexture API. For high frequency partial updates, the UpdateTexture paradigm is likely the better choice.

As useful as dynamic resources can be, be careful when designing systems that rely heavily on dynamic submission. Static resources should be placed into POOL_MANAGED to ensure both good utilization of local video memory, and to make more efficient use of limited bus and main memory bandwidth. For resources that are 'semi-static', you may find that the cost of an occasional upload to local video memory is much less than the constant bus traffic generated by making them dynamic.

System Memory Resources

Resources can also be created in POOL_SYSTEMMEM. While they cannot be used by the graphics pipeline, they can be used as sources for updating POOL_DEFAULT resources via UpdateSurface and UpdateTexture. Their locking behavior is simple, although stalls might occur if they are in use by one of the previously mentioned methods.

Though they reside in system memory, POOL_SYSTEMMEM resources are limited to the same formats and capabilities (such as maximum size) supported by the device driver. The POOL_SCRATCH resource type is another form of system memory resource that can utilize all formats and capabilities supported by the runtime, but cannot be accessed by the device. Scratch resources are intended primarily for use by content tools.


General Recommendations

Getting the technical implementation details of resource management correct will go a long way to achieving your performance goals in your application. Planning how the resources are presented to Direct3D and the architectural design around getting the data loaded in a timely fashion is a more complicated task. We recommend a number of best practices when making these decisions for your application:

  • Pre-process all your resources. Relying on expensive load-time conversion and optimization for your resources is convenient during development, but puts a high performance burden on your users. Pre-processed resources are faster to load, faster to use, and gives you the option of doing sophisticated off-line work.
  • Avoid creating many resources per frame. The driver interactions required can serialize the CPU and GPU, and the operations involved are heavy-weight as they often require kernel transitions. Spread out creation over several frames or reuse resources without creating/releasing them. Ideally, you should wait several frames before locking or releasing resources recently used to render.
  • Be sure to unbind all resource channels (i.e. stream sources, texture stages, and current indices) at the end of the frame. This will ensure that dangling references to resources are removed before they cause the resource manager to keep resources resident that are actually no longer in use.
  • For textures, use compressed formats (e.g. DXTn) with mip-maps and consider making use of a texture atlas. These greatly reduce bandwidth requirements and can reduce the overall size of the resources making them more efficient.
  • For geometry, make use of indexed geometry as this helps compress vertex buffer resources and modern video hardware is heavily optimized around reuse of vertices. By making use of programmable vertex shaders, you can compress the vertex information and expand it during the vertex processing. Again, this helps reduce bandwidth requirements and makes vertex buffer resources more efficient.
  • Be careful about over-optimizing your resource management. Future revisions of drivers, hardware, and the operating system can potentially cause compatibility problems if the application is tuned too heavily to a particularly combination. Since most applications are CPU bound, expensive CPU-based management generally causes more performance issues than they solve.
  • [출처] DirectX Video memory|작성자 예스빌


http://hldec.net/77

깊이맵과 노말맵을 이용한 외곽선과

단순한 명함처리를 설정하여 만든 카툰 랜더링 예제

근데 LPF가 머지? ㅡ,.ㅡa

http://hldec.net/78


아직 제대로 읽어보지 않았지만 이미지만 봤을시에 상당히

매력적인듯하다.

원 작성자: maitte (구 kgda)

작성일 : 2004/7/6 10:00

--------------------------------------

3차원 그래픽을 표현하는데 있어서, 많은 분들이 헷갈리는 것들이 바로 쉐이딩이라는 것입니다.

3차원 그래픽에서의 쉐이딩은 그림자(쉐도우)와는 명확하게 구별됩니다.

쉐이딩은 빛에 의해서 빛이 어떻게 비추어지느냐를 다룬다면, 그림자는 빛이 비추는 방향으로부터 빛을 차단하는 장애물이 있는지 없는지를 다룹니다.  쉐이딩이 아날로그적 특성을 가진다면, 그림자는 바이너리적 특성을 가집니다.

그림에서 나온것처럼 쉐이딩은 빛의 방향에 따라서 크게 세가지로 나누어집니다.

A 영역은 빛이 비추지 못하는 영역이고요.

B 영역은 빛이 비추어지지만, 빛의 각도에 따라서 빛에 대항 영향이 연속적으로 바뀌는 영역입니다.

C 영역은 빛이 곧바로 비춰져서 빛의 색이 그대로 투영되는 영역입니다.

이것을 각각, A : Ambient, B : Diffuse, C : Specular 로 나눕니다.

재질을 설정할때..

Ambient의 값은 A, B, C 모두에 미칩니다.

Diffuse의 값은 B, C 영역에 미칩니다.

Specular의 값은 C 영역에 미칩니다.

Emissive의 값은 A, B, C 모두에 미치지만, 조명과는 관계가 없습니다.

Shininess의 값은 C 영역의 크기와 밝기를 결정합니다.  이 값이 크면 C 영역은 줄어들면서 밝기가 증가하지만, 작으면 C 영역은 늘어나면서 밝기가 감소합니다.  전자의 경우에는 반사도가 큰 메탈 재질 등, 후자의 경우는 반사도가 작은 종이, 나무 재질 등에 사용합니다.

다소간에 도움이 되었으면 하네요.

[출처] 조명에 의한 쉐이딩 정리(Ambient, Diffuse, Specular, Emissive)|작성자 재준


이 방법은 얼마전 GCC 컴파일러의 옵션으로 병렬 컴파일 하는 것과 같은 방법으로 하는 듯 하다.

2008 버전의 cl.exe 컴파일러가 멀티프로세스 빌드 옵션을 지원한다.

그 옵션은 /MP 혹은 /MPn 이며, n 은 숫자이다. n 은 CPU 코어 숫자를 기입하면 되지만,

좀 더 크게 해도, 아주 약간의 성능 향상이 있을 수도 있겠다. GCC 와 마찬가지로.


Visual Studio IDE 환경에서 사용하려면

[Project] - [Properties] - [Configuration Properties] - [C/C++] - [Command Line] 에

/MP 을 기입하면 되지만, /Gm 옵션과 충돌한다 ! warning 메시지가 뜬다.

그럴 경우에는,

[Project] - [Properties] - [Configuration Properties] - [C/C++] - [Code Generation] 에서

Enable Minimal Rebuild 옵션을 꺼주면 된다.


병렬 컴파일과 최소 리빌드 옵션이 왜 충돌나는지는 잘 모르겠으나, 하라는 대로 한다.


예전에 테스트로 작성한 10만 바이트 C++ 프로젝트(약 4000라인)를 리빌드 하는데,

기존 방법으로는 17 초 정도 걸렸는데, /MP 옵션을 적용하자 6초 내외 걸린다.

아마 파일 수가 여러개야만 효과가 있을 것이다. output 에도 한꺼번에 여러개씩

컴파일 완료되는 메시지를 보게 될 것이다.

(다만, 파일수가 소수라도, CLR 프로젝트의 경우 ASSEMBLER? 로 분리하는 개념이 있다고 하니..

효과적이라고 한다. 그렇다면, .NET 류 언어들은 /MP 가 지원되는지는 모르겠으나,

역시 더 빨리 컴파일 할 수 있을 것이다)

거의 3배 가까이 빨라진 것이다. 여튼, C/C++ 컴파일 속도가 너무 느려서 좌절할 때가 있었는데,

다행히 VC++ 에도 이런 기능이 넣어지는구나.


물론, 더 빠른 컴파일 성능을 위해서라면 거대한 프로젝트에는 이 방법으로는 한계가 있으니,

대형 개발 업계에서는 분산 컴파일이라는 기법을 이용한다.

유닉스는 distcc 라는 것이 존재하며, VC 에는 아마 2008에서 팀에디션에서 지원한다고 했던가..

정확히는 모르겠으나, 별도의 서드파트 패키지도 있다. 이 것을 쓰게 되면,

별도의 빌드 서버를 (1개이상) 마련해 놓고, 그 서버의 힘을 빌려 더 빠른 속도로 컴파일하게 된다.

Visual Studio를 하다 보면 찾기를 할때 이런 에러 메세지를 출력할때가 있다.

No files were found to look in. Find was stopped in progress.
 
이때 Ctrl + Scroll Lock를 누르면 정상적으로 작동을 한다.

버그같은데... 수정 안해주나?  


몇몇 분들의 요청으로 간략하게 적어보겠습니다만...


제가 UML을 정식으로 배운 것도 아니고 그냥 대충 제멋대로 이해하고 사용하는 것 이기 때문에


실제 정석으로 배운 분들이 보기에 여러가지 잘못된 점이 많이 있을겁니다.


잘못된 부분이 보이거나 의견이 있으시다면 코멘트로 달아주시면 감사하겠습니다.


잘못된 점을 수정하고 좋은 조언을 달게 받아 수정을 하겠습니다.


아참... 스크롤의 압박이 무지 심합니다.


일단 StarUML 프로그램 다운로드 링크입니다.


http://sourceforge.net/projects/staruml/files/staruml/5.0/


프로그램을 다운받아서 설치하시면 되겠습니다.


비지오로 사용하시는 분들은 비지오로 하셔도 무관합니다.


UML로 클래스 다이어그램을 그리는 목적


왜 우리는 클래스 다이어그램을 그려야 하는가.


소스코드를 작정해 놓고 그것만 보고서 구조가 어떻게 되어있고 동작이 어떻게 이루어 지는가를


알아내기는 무척 어렵습니다.


하지만...


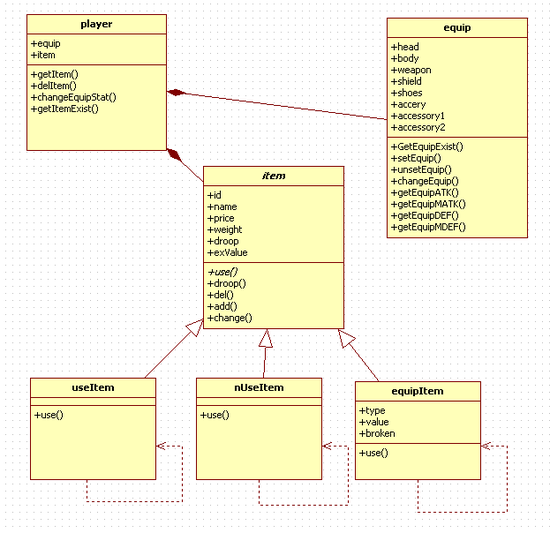
이정도만 보면 대충 어떻게 되는지 알 수 있지 않을까요?


여튼 직접 코드를 짜지 않고서도 구조를 어느정도 미리 그려보는 용도도있고


타인이 코드를 직접 분석하는 것 보다 이렇게 다이어 그램을 통해 어떻게 돌아가는지


알 수 있기도 하고 그 외에도 여러가지 이점이 많습니다.


자~ 그럼 이제부터 하나씩 파보도록 하겠습니다.


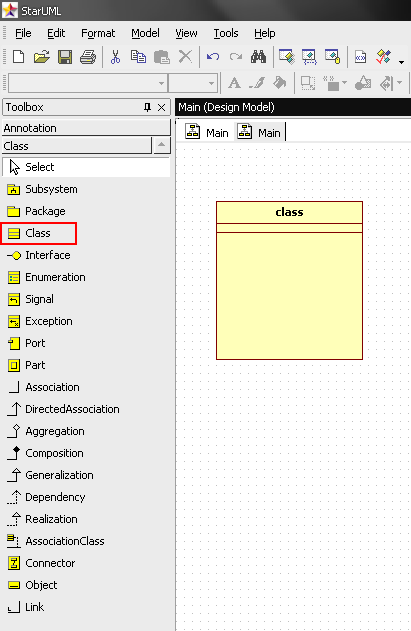
일단 클래스입니다.


클래스를 만드는 것은 매우 간단합니다.


클래스를 선택하고 드래그 하면 끝이니까요.


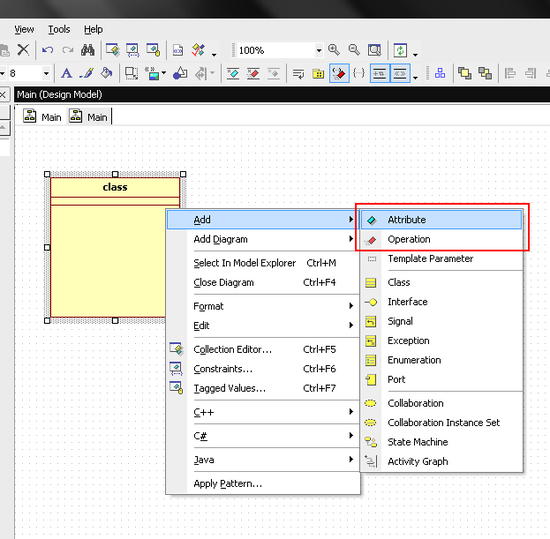
그리고 변수와 함수들을 추가해 줍니다.


클래스에 마우스 커서를 대고 오른클릭을 하면 메뉴가 뜹니다.


변수와 함수를 각각 추가해 줍니다.


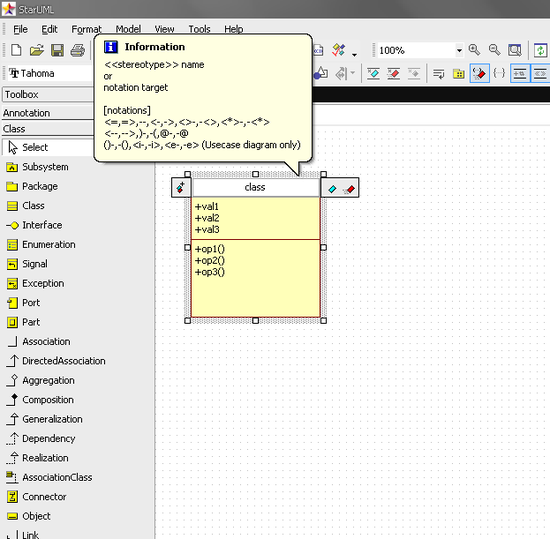
아참


생성한 클래스명 변수명 함수명은


더블클릭을 하면 아래 그림처럼 에딧창이 나타나면서 변경이 가능합니다.


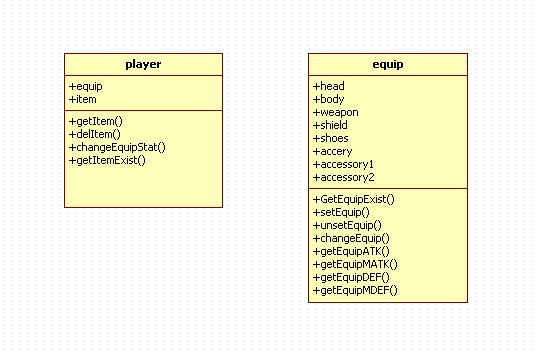
이녀석의 이름을 바꿔주고 구성품 클래스를 하나 만들어 보겠습니다.


player는 equip를 가지고 있습니다.


하지만 처리를 좀 원할하게 하기 위해서 클래스로 만들었습니다.


그리고 player가 소유한 변수중에 equip라고 있는게 보이시죠?


좀 더 쉽게 예를 들어볼까요?


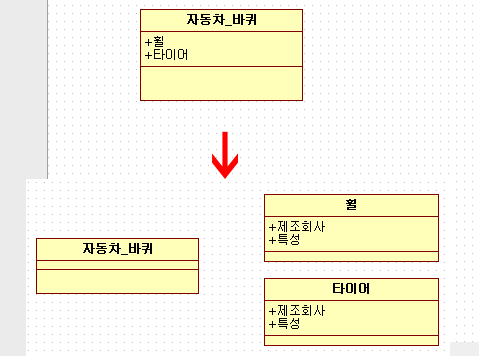
자동차 바퀴라는 클래스에


휠과 타이어라는 변수가 있습니다.


하지만 휠과 타이어는 각각 여러가지 속성이 존재하죠


제가 차 바퀴에 대해 잘 몰라서 제조회사, 특성 이라고만 적어 놓았지만


타이어의 경우 스노 타이어인지 차종이나 크기 등은 어떤거에 맞는 것인지 등등


여러가지 속성이 있습니다.


그런 모든값을 자동차 바퀴 라는 클래스에 몰아넣는 것은 별로 좋은 생각이 아니라고 봅니다.


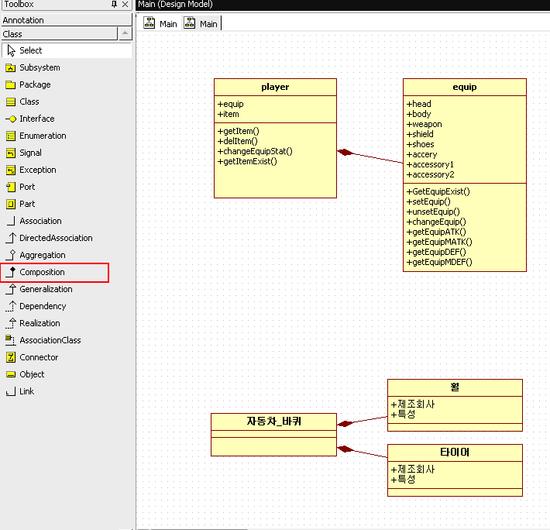
그래서 따로 클래스를 만들어서 자동차 바퀴라는 클래스에 포함시키는 것이죠


뭐 간단하고 친절하게 composition이라고 쓰여저 있는걸 선택해서 둘을 이어주면 됩니다.


그 위에 Aggregation이라고 속이 빈 마름모가 보일겁니다.


이건 아주 살짝 다릅니다.


차이점이 하나 존재하거든요


바로 그 클래스가 릴리즈되는 시점의 차이 입니다.


composition의 경우 소유하는 클래스가 죽을때 소유당하는 클래스가 같이 죽지만


aggregaton의 경우에는 소유하는 클래스가 죽을때 소유당하는 녀석들이 같이 죽지 않는다는


차이점이 있습니다.


aggregation의 경우에도 클래스가 다른 한 클래스를 보유한다는 것에는 차이가 없습니다.


하지만!


속이 빈 마름모로 연결을 해 놓을경우 자식(?)보다 부모(?)가 먼저 죽을 수 있습니다.


예를 들면 다음과 같습니다.


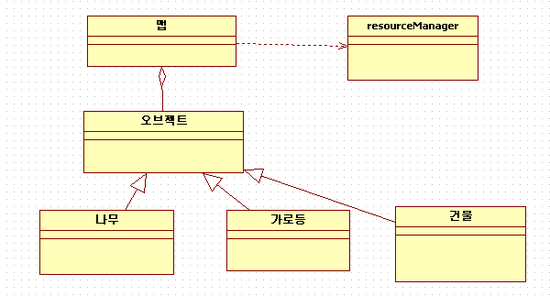
맵을 띄울때 맵이 가진 요소들이 있을겁니다.


예로 나무 가로등 건물 등이 있다고 가정하죠


이때 맵은 분명히 오브젝트들을 소유하고 있습니다.


하지만 오브젝트를 읽어서 초기화 하고 삭제하는 일은 맵이라는 클래스가 하지 않습니다.


맵은 리소스 관리자 클래스에게 오브젝트를 읽어달라고 하고 포인터를 받아서 소유합니다.


맵이라는 클래스에서 release라는 함수를 불러서 자신을 릴리즈 할 경우에도


리소스 관리자에게 오브젝츠들을 릴리즈 해달라고 요청하지 않는 이상 오브젝트들은 살아남습니다.


오브젝트들은 자기 소유자가 죽더라도 자신은 죽지 않습니다.


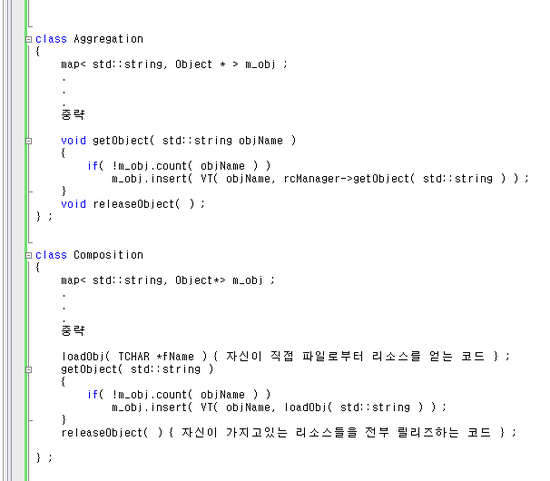
소스코드로 보면 좀 더 이해가 잘 되실까 해서 간단히 적어보겠습니다.


aggregation의 경우 다른 클래스에게서 리소스를 읽어달라고 요청하고 포인터만 받아서 사용하고


자신이 리소스를 릴리즈 하지 않습니다.


하지만 composition의 경우 자신이 직접 리소스를 읽어서 사용하고 자신 스스로 해제해 버립니다.


클래스 자신만 쓰고 버리면 그만인 경우에도


리소스 관리자에게 한번 읽었으면 지금 당장은 사용하지 않더라도 나중에 다시 사용할 일이 있으면


현재 사용하는 리스트만 초기화 해버리고 메니저에게 일일히 해제하라고 이야기 하지 않는 경우가


많이 있습니다.


자주 사용하는것은 남기고 크기가 크거나 자주 쓰지 않는건 물론 자주 릴리즈 해야겠지요


이야기가 삼천포로 좀 빠졌지만...;


다시 돌아와서


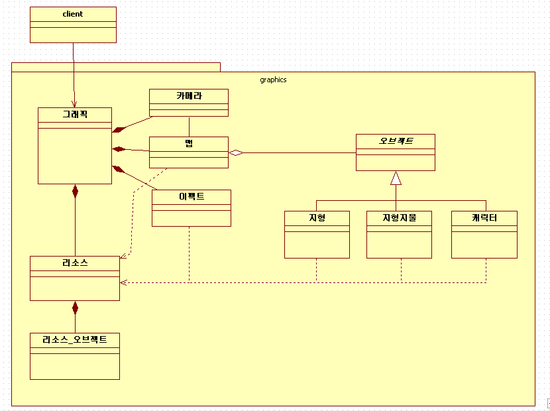
이번엔 좀 큰그림을 그려놓고 설명하겠습니다.


일단 graphics라는 package를 하나 바닥에 깔아놓은 것이 눈에 띄죠


저녀석은 namespace입니다.


우리가 자주 사용하는 것 중에 namaspace std라는 것을 자주 사용하죠


그안에 vector map string 등등 우리가 좋아하고 자주 사용하는 것들이 들어있습니다만


저런 이름들은 자주 사용할지도 모르기 때문에 사용하는 것 입니다.


제가 위에 그린 예제도 저녀석들은 하나의 라이브러리로 만들어 놓았다고 가정할 경우


리소스라는 클래스가 있습니다만 물론 gsResource라던가로 하겠지만


혹여 어떤사람이 gsResource라는 클래스를 만들어 버린다던가


설마? 하는 문제를 위해서 라는 의미가 일단 가장 큽니다.


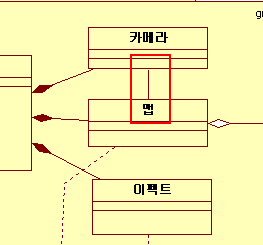
Association 실선으로 이어진 것을 제휴관계라고 하는데요


간단하게 말하자면 '두 클래스가 서로의 정보를 이용한다'라는 정도로 이해하시면 됩니다.


카메라는 자신의 눈에 해당하는 곳의 바로앞에 오게되면 카메라 위치를 강제적으로 옮기거나


못보게 해야하는 곳으로 맞추는 것 등을 방지하던가 맵의 데이터를 많이 사용합니다.


반대로 맵의 경우 카메라의 절두체에 해당하는 곳 밖의 오브젝트들을 그리지 않아야 하고


멀리 있는것이면 폴리곤을 조금 사용하는 대처품으로 교체한다던가 카메라를 강제로 옮기지 않고


카메라의 눈 앞에있는 오브젝트를 반투명하게 한다던가 기타 등등등


카메라의 위치 정보와 절두체 등의 정보를 많이 사용합니다.


서로 상대방이 가진 정보를 사용할 일이 많기 때문에 제휴관계 라고 표시를 해둡니다.


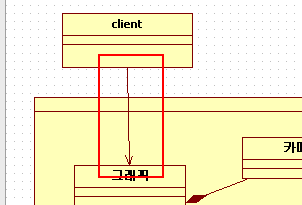
DirectedAssociation 일방적 제휴관계라고 하네요


클라이언트는 graphics라는 녀석중에서 그래픽이라는 facade클래스를 통해 그래픽 데이터를


처리합니다.


일단 이녀석은 라이브러리로서

#include "gsgraphic.h"

pragma commant( lib, "gsgraphic.lib" )


using namespace graphics ;


이렇게 해놓고 쓸 녀석인 만큼 그래픽이라는 클래스에서 클라이언트에 대해 뭔가를 특정하기엔


무리가 있으며 클라이언트쪽에 뭔가 요청하거나 할 일이 없습니다.


클라이언트가 일방적으로 뭔가 넣고 초기화 하라고 시켜서 초기화 하고


말 그대로 하라는 일만 소처럼 열심히 하는거죠


그래서 일방적 제휴라고 하는 것 같습니다.


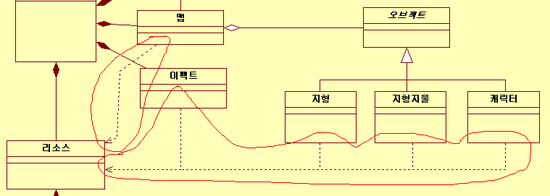
위 그림처럼 점선으로 이어놓은 것을 Dependency 의존관계 라고 합니다.


지형지물이던 맵이던 이펙트던 스스로 리소스를 파일에서 읽는짓은 하지 못합니다.


왜냐구요?


만약 저녀석들이 각각 리소스를 파일에서 읽는 작업을 한다고 가정하면....


5개 클래스 각각 파일을 읽고 파일의 정보들을 구조체에 담고 분류하는일을 갖고 있어야 할겁니다.


5개 클래스에 동일한 코드와 비슷한코드가 똑같이 박혀있는 것부터가 일단 용납이 안되며


리소스 재사용이나 쌓아둔 양에따라 적당히 잘 안쓰는건 릴리즈 한다던가 하는 관리를 위해서라도


리소스를 관리하는 클래스를 따로 두고 관리해야 하지 않을까 합니다.


일단 딴 이야기는 이쯤 하고...;


클래스의 일부 기능을 타 클래스의 힘을 빌려서 해야할 경우에 의존적이라고 하고


저렇게 점선에 화살표로 표기합니다.


그 외에 의존하는 클래스의 변화에 영향을 받기도 한다고 기억하고 있습니다만


리소스를 읽는 과정 자체가 리소스 클래스가 가지고 있고 리소스 객체의 형태가 변한다면


각자 받아온 값을 활용하는 법도 확실히 바뀌는 일이 있을지 모르겠군요


다음은 Multiplicity입니다. 수량이라는 게죠


맵은 반드시 1개가 존재하고 오브젝트는 0개가 될수도 있고 몇개가 될수도 있습니다.


저런식으로 수치를 넣어주는 것 입니다만...


쓰기 나름입니다.


1 - * 이라고 해도 위 그림과 같은 의미이고


1 - 5 라고 하면 반드시 1개와 5개가 맞물린다는 것입니다.


10개짜리 분산서버와 유져들간의 커뮤니케이션은 10 - * 일테고 말이죠


하지만 이것을 꼭 표기해 줄 필요는 없다고 생각합니다.


대부분 1:1로 맞물리는 경우이고 꼭 필요하거나 강조하고 싶은 부분에서만 표기를 하고


당연하다 싶은 부분은 그냥 생략하는게 좋다고 생각합니다.


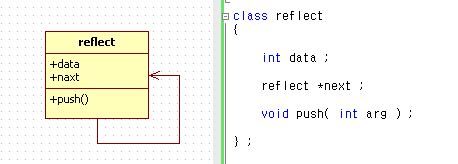
reflexive 반사?


클래스들은 자기 자신이 자기 자신과 영향을 주고받을 수도 있습니다.


스크롤의 압박도 심하고 머리도 아픈데 여기서 또 이상한게 나왔네


아... 이건 또 뭡니까? 하시는 분들이 계시겠지만 생각보다 간단합니다.


코드 자체는 엉터리지만 그런건 좀 넘어가 주세요...;


이녀석은 자기 자신을 일방적으로 제휴합니다.


next만 알지 자기 이전에 대해서는 알지를 못합니다.


push함수에서는 자기 다음녀석을 생성해서 값을 써 넣는일만 하겠죠


저런식으로 자기 스스로에게 영향을 미치는 것을 반사~ 라고 합니다.


지금껀 반사 일방적 제휴겠죠 reflexive DirectedAssociation


자기 전과 후의 값을 알면 그냥 반사제휴일테고 말이죠 reflexive Association


그 외에 이런것들이 있습니다.


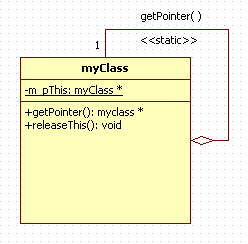
위 그림은 싱글톤 클래스 입니다.


자기 자신에게 연결된 끝이 마름모꼴인 직선을 주시해 주세요


싱글톤 클래스도 반사제휴의 대표적인 예 입니다.


그 외에도 저 그림을 보고 알아야 하는 것이


myClass *test ;


test = test->getPointer( ) ;


위와같이 코드를 짤텐데 말이죠


저녀석이 static 정적 맴버를 사용한 정적 함수처럼 작동하고 있고


싱글톤 클래스의 포인터를 얻고있다는 의미로 getPointer( ) 와 <<static>>를 표기해 주었습니다.


그 다음


-m_pThis: myClass *


밑줄 underbar은 이 변수가 static 정적 변수라는 것을 의미합니다.


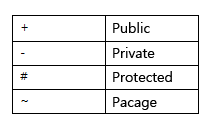
-기호는 이 변수가 private변수라는 것을 의미


맴버 변수의 속성


: myClass *는 m_pThis라는 변수의 변수형이 myClass형 포인터 라는 것을 의미합니다.


함수의 경우


-init( HWND hWnd, int width, int height ) : bool

속성 함수명 인자 : 반환값


위와같은 형식으로 표기가 가능합니다.


음... 거의 끝이 나 가는군요


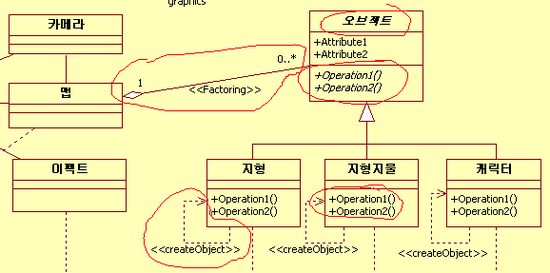
위 그림은 데이터 팩토링에 대해서 나타난 것입니다.


일단 맵과 오브젝트를 잇는 선에 1 - 0.*이라고 해서 한개의 맵과 다수의 오브젝트가 있을 수 있고


<<Factoring>>라고 표기도 해줬습니다.


그리고 지형 지형지물 캐릭터 클래스를 보면 자기 스스로를 의존하고 있는 반사 의존을 표기해


준 상태인데요 저것은 자기 자신의 메모리를 할당해서 되돌리는 함수를 의존한다는 뜻 입니다.


가능하면 <<메모리를 할당해서 되돌려주는 함수명>>으로 하는 것이 좋을 듯 합니다.


오브젝트 클래스를 보면


오브젝트라는 클래스 이름과 operation1( ) operation2( ) 라는 두개의 함수명이


옆으로 살짝 기울어져 있는 것이 보이실겁니다.


일단 클래스 이름이 기울어져 있는 것은


저것이 추상 클래스로서 인스턴스를 생성하지 않을 것이라는 것을 의미하고


함수 두개의 이름이 기울어져 있는 것은 저 함수들이 가상함수라는 것을 의미합니다.


저런식으로 가상함수와 추상 클래스를 표기해서 인터페이스를 그리는 방법도 있겠지만


저는 자바사용자가 아니고 C++에서는 interface라는 개념도 없어서 인터페이스에 관해서는


자세히 모르겠네요 ;ㅅ;


제 블로그에 있는 정보들은 모두 수정 및 퍼가는것을 제한하고 있지 않으며


오른클릭과 Ctrl + C도 먹으니까 자유롭게 활용하시면 됩니다.


그리고 필요하신 것을 요청하시면 가능한 것이라면 도와드리는 주의랍니다.


마음껏 가져가세요~


http://blog.naver.com/kottodat/80104635200 에서 퍼왔습니다.

예전에 시스템 환경변수를 어떻게 알아오는지 궁금했는데 
이제야 겨우 알게 됐네. ㅜㅜ
첫번째 인자는 환경변수 네이밍이고
두번째 인자는 경로를 받을 변수, 
세번째 인자는 변수의 길이이다.
SystemRoot는 기본적으로 윈도우의 경로가 나온다.

GetEnvironmentVariableW(L"SystemRoot", lpwBuffer, MAX_PATH)


시스템 환경변수 등록 함수
위와 비슷..;;
SetEnvironmentVariable("Library", lpwBuffer)

+ Recent posts